Potatoes:
The front of the shop looked a bit sparse. Although in previous weeks, I added a step ladder and a few additional props to the shop front, it still seemed a bit plain.
So I modelled and textured some potatoes. I modelled a total of 5 potatoes out of geospheres inside of 3ds max, using soft selection to make crevasses and lumps to make the potatoes feel more organic.
The beauty of using geospheres rather than regular spheres is I could cut the UV straight down the middle of the sphere and lay it flat. When you use regular spheres, you get triangles at the top of the mesh which can cause issues with the unwrap and make the texturing look unusual.
After I unwrapped them, I took them into substance painter to texture.
 |
| Potatoes inside of substance painter |
 |
| Potato references |
When texturing the potatoes, I didn't want straight from the ground earthy/dirty - I wanted them to look more dusty, my reasoning for this is I could have some of the potato skins exposed, whereas if I did it purely brown and dirty, the viewer could have possibly confused them with rocks or stones rather than potatoes.
Using a bunch of 'dust soft' masks and height maps, I was able to make my potatoes look like the reference.

For some additional narrative, I thought it would be a good idea to stack boxes with potatoes inside them and have one knocked over, revealing all the potatoes inside the wooden box.
Here I used a deffered decal with a leak opacity map which I had already used on my walls, I did this to cast some 'dirty water' look over the top of the potatoes, it almost feels like the dust/dirt of the potatoes has mixed with the puddle it sits in causing clumping of dirt into mud.
Scene development:

A lot of the most drastic changes include the lighting and post processing. Until I adjusted the lighting, there were many people telling me that the scene looked 'stylised' mainly because there was no buildup of dirt which was causing the scene to look stylised. But since I colour corrected it to be slightly more yellow than having the contrasting orange and blue colours, as well as the sharper and darker shadows, it looks more realistic and grounded.
From here it is just a case of onboarding as much feedback as possible and implementing said feedback.
Light switch Blueprint:

Here is an example of me using the light blueprint in the level, as you can see the lights, including the emissive, point light switch off, as well as the switches flick up and down.

This is an example of the blueprint set up, I will go over in detail what each section does.
Keyboard Input and Sequencer:
Initially, I tried investigating how I could plug in multiple values from one input, but the 'custom event' in this case the E key press, wouldn't connect to anything other than a single node. So I browsed solutions and found a sequencer was the way to achieve multiple values being changed.

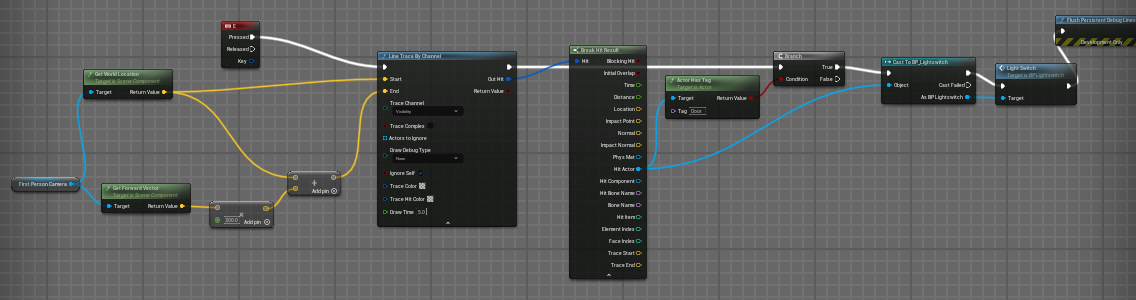
I also reused first person code from my bell blueprint, as I made my bell move when pressed, so instead of casting to bell, I casted to the light switch blue print followed up by the custom event - so theoretically speaking, the keyboard input was cast by a line trace within the first person character point of view, which then triggered the code to run the sequencer with animations, toggleables and sound.
Point light on and off:
I added the lamp shades and point lights to the blueprint, replicating the same positions I had the lights at prior to the blueprint creation.
Using a clip flop, I had 2 states for each object (not just these point lights) I had a state for on and off. By toggling the 'new visibility' on the set visibility node, I was able to turn the visibility of the light off, then inverse of that, I left the other one as default to mean on.

Light switch animation:
For the switch animation, I set the pivot point for a single switch to match the ball joint in 3ds max, so the pivot could work as intended in the animation.

I then animated it with a set relative rotation, which again was connected to a flip flop to alternate between 2 states - either on or off. All I did was set the relative rotation to 45 degrees the play it on a timeline so the animation would be visible in the viewport.

Emissive scalar parameters:
I had an emissive channel on my light to help improve the light visibility and to act like the light was on without adding a bulb to the lamp shade mesh.
In my material instance, I had an emissive boost parameter, which essentially toggles how dark or bright the emissive light can be.

The off scalar parameter was set to 0 meaning 'off' and the on scalar parameter was set to 2.5, which gave it a nice glow - which were all connected to a flip flop.
Sound:

And finally was the sound, which was the most simple piece of the blueprint to complete - all I had to do was get to states of a switch sound, 1 for on and another for off and connect these to a flip flop and plug it into my sequencer.
All of these nodes were on the sequencer, meaning they could fire simultaneously - this gives extra depth for player interaction within my level.
I originally thought this would be quite difficult, it wasn't too difficult, it was more time consuming than anything. Mainly because I had to copy and paste nodes several times over and copy and paste values into nodes.
Audio Design:
I wanted to add some more liveliness to my props when you interact with them.
So I gathered some items I had around my house so perform audio design with audacity.

Here is a Colman's metal tin that I used, I did 4 takes within audacity of me putting/slamming it down onto the desk, because the desk is made of wood, it would have the same kind of acoustics as the countertops in the shop.
This corresponds with the Rowntree's metal tin within the level.
 |
| Corresponding asset |


I used a tub of rocks from my hobby collection to drag over my desk to act like I was putting down another item, which I assigned to the treacle can.
Background buildings:
One suggestion for my work was to fill out the space in the background. This proved difficult, Because the main building was already 3 stories tall, the assets that had to fill the space above had to be taller than 3 stories.
Using reference I gathered I decided to go with a cathedral and model a building based off what is now known as 'JP Morgan - Victoria Embankment'
 |
| JP Morgan building |
 |
| Google Street view of Leicester Cathedral |
No comments:
Post a Comment