Item pickup debugging:
When I originally started making these blueprints, I ran into multiple issues, one of the main issues that concerned me was, when someone played the level, they would take the item elsewhere and drop it and the next person to play it wouldn't be able to find it. So to combat this, I needed a feature where you could pick up the item and it would return back to it's position once it was put down.
I did this 2 ways - 
The method I used was to set up 2 teleport functions - I copied and pasted the item coordinates into the teleport function. The top function is the interaction function, meaning when E is pressed upon putting the item down, it teleports back to the original location.

The bottom function is when the player exits the blueprint item collision, the item teleports back to its original position.
This way I was confident the player couldn't put the item elsewhere in the level.
I originally tried this function on the first player character, but without prior knowledge, it teleported the player, rather than the item, so I put this teleport function on the item instead of the player.
 |
| Example of the teleportation in action |
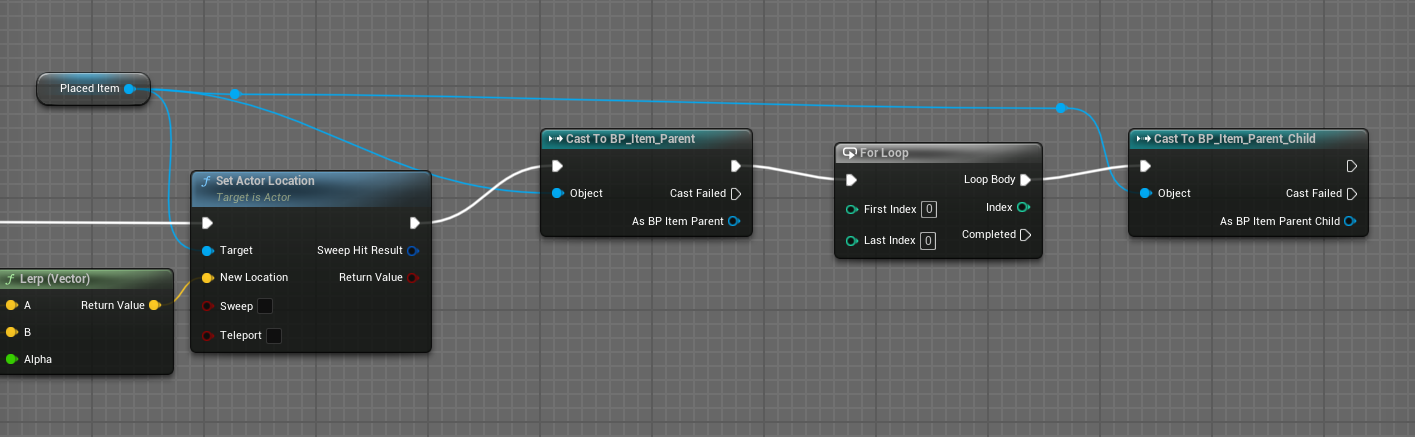
Another issue I encountered was the inability to use a child blueprint actor, for some reason the child inherited the original locations and when E was pressed to pick up the secondary item it crashed/stopped the simulation with the error message 'infinite loop'
So to break this I put in a for loop in order to break this part of the simulation and to have 2 separate objects concurrently having similar attributes in order to stop this crash.
 |
| Code causing the game to crash |
 |
| New code with the for loop that stopped the game crash |
Changes to the road:
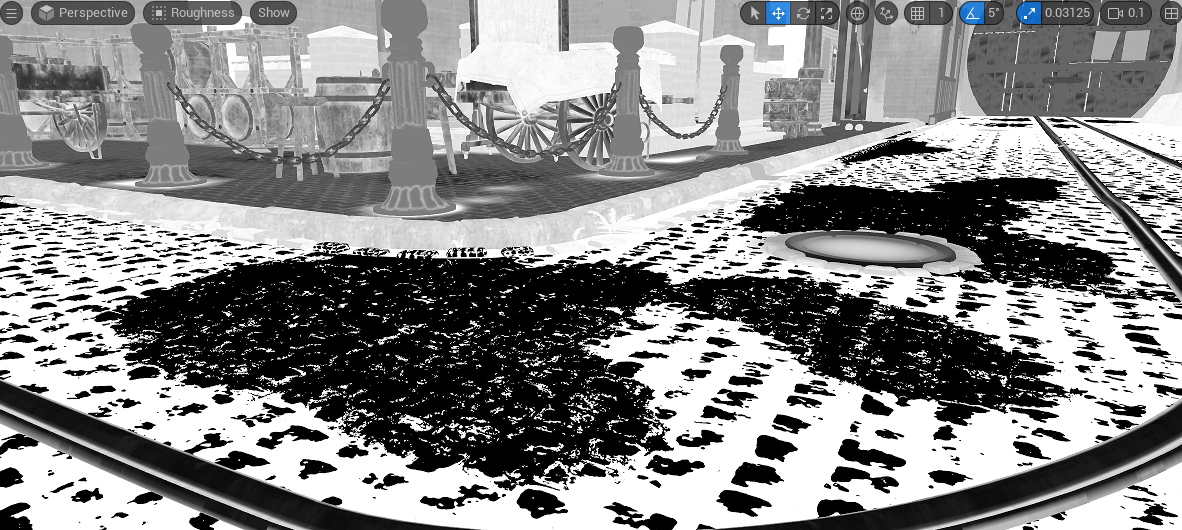
When I originally vertex painted on my roads for material breakup, I thought the puddles seemed fine. But on closer inspection, I realised my puddles weren't reflective enough.
So to combat this, I went ahead and changed the roughness and specular of the puddles in order to get that reflective feel, rather than it looking like a discoloured piece of road.

I have several parameters I can use to control the roughness intensity and specular - When viewing the channels originally, the roughness and specular were the same colour, so it was just a case of inverting the specular, however, after inverting the specular, it affected the whole mesh. So I took my wet tiling texture and put it back through substance designer to add a mask into the blue channel as the cobblestone wasn't utilising a metallic map.

By using this blue channel as a mask I could control the specular,while also having a one minus (1-x) coming from the original roughness channel in order to invert it to the corresponding specular.

Notice how in this image the cobblestone is discoloured, but isn't showing forms of reflection.

Notice how on the newer version, you can clearly see reflection in the puddle.
 |
| Puddles up close |
 |
| Reflections of assets in the puddles |
 |
| Roughness visualisation |
 |
| Specular visualisation |
Newspapers:
I thought a nice idea would to add some discarded newspapers throughout the scene, this way it could add more breakup and narrative.

I made this 512x512 atlas of newspapers from around the time period my level is set. I exported this from Photoshop and into substance painter, where I added some more details, which include the following:
- Ripped edges with opacity
- Slight discolouration and roughness variation with a dirt generator
- Crumples generator on the height (exported as normal) to act as creases on the paper
I pulled a plane over these inside 3ds max, imported the planes into unreal and instanced them around sparingly.

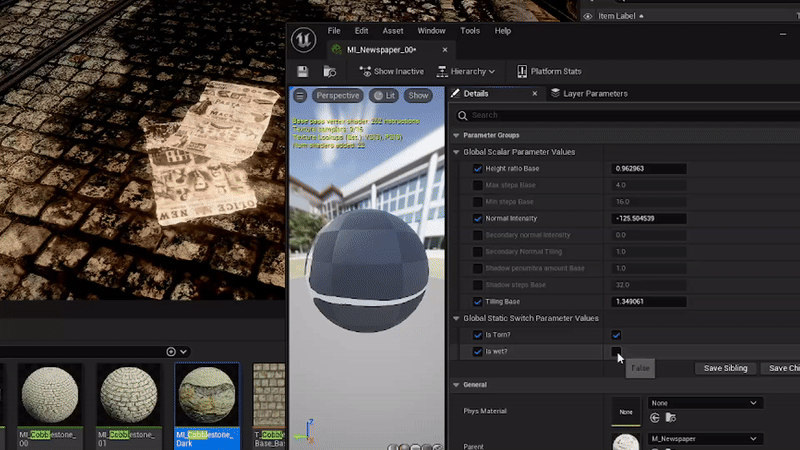
Here is a material instance I made with various parameters.
Some parameters include:
- Is wet? (This acted as a static switch to make the newspaper reflective when it is in a puddle)
- Is Torn? (This static switch turned the opacity on and off acting like tears in the paper, or straight sheets)
- Normal intensity (Controlled the crumples normal that I exported out of substance painter with the other textures)
- Secondary normal intensity (Controlled BnW spot detail normals for the newspaper)
- Base tiling (Tiled the normals for the crumples)
Every other parameter controlled the displacement map to act as parallax to make the newspapers look 3D around the creases.
Blue Plaque:
For some extra narrative storytelling, I remembered that in London there are some blue plaques representing famous people that contributed something to society, whether it was literature, activism, sciences, etc.
I researched when these plaques came to fruition - the introduction for these plaques was in 1867 when it was run by 'The society of arts' - today, these plaques are run by English heritage.
I thought it would be a cool idea to have some of these plaques on my buildings.


One plaque is dedicated to Jonathan Stephan Alberton, the founder of the Alberton brewing company.
The other plaque is dedicated to the visit of the then prince of wales (soon to be Edward VII) earning the royal seal for the company. The street 'Prince street' is names after the then Prince (Edward VII) which ties in nicely with the overarching theme of the coronation.

Extra Scene breakup:
The scene looks nice currently, but just for that extra bit of material breakup, I went ahead and added some additional features to the level.

Using the already existing procedural dirt inside of multiple materials, I copied and pasted the function inside of my pipes and made this a material instance.
The pipes looked fine, but I could add extra visual noise and ware in order to make it look more grungy.
No comments:
Post a Comment